
User manual
Overview
The Scoring software is a web application designed to build protocols and to collect observational data (scores, criteria, discrete quantitative data, etc.). It is a generic assessment engine: the examples in this documentation are taken from the health field, but the tool applies to any context where assessments are carried out.
The interface runs in a web browser (developed and tested under Mozilla Firefox). The software is written in HTML and PHP and relies on a MySQL database.
This documentation is the user guide (entering scores and extracting results). A developer guide, devoted to building protocols, may supplement it later.
User guide
The main menu
The main menu, located at the top of every page, is divided into six sections:
- Overview
- Components
- Events
- Actors
- Settings
- Session

Each section offers sub-menus; pages are then reached through a list of choices shown in the body of the page. A link to context-sensitive help is available on every page.
Actor roles
Your role (Administrator, Principal Investigator, Investigator, Monitor or Subject) determines the actions you are allowed to perform. Configuration and data-entry operations are reserved for investigators and administrators; the Monitor and Subject roles have restricted access.
- Subject — the person (or entity) being assessed.
- Monitor — oversees the proper conduct of a study.
- Investigator — can build protocols.
- Administrator — responsible for the overall use of the software.
The actual data entry is carried out by the authorized actors.
Session, account creation and reset
Opening a session
A session must always be opened in order to access the database.

Creating an account
For first-time use, click "Create an account", then fill in last name, first name, email address and password (to be confirmed).
- The password must be between eight and sixty-four characters (letters, digits or symbols).
- Submit the form: an actor is automatically created and linked to the account, with the "Monitor" role by default (the administrator can adjust this role afterwards).
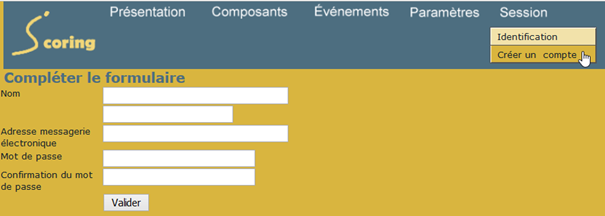
Account creation form.

Once the form is submitted, a confirmation email is automatically sent to the address provided.

The account can only be used after clicking the activation link received by email.
Resetting your password
If you forget it, the password can be reset without the administrator's involvement.
- On the login page, click "Forgot your password? Reset my password".
- Enter the account's email address, then submit. A message confirms that an email has been sent if an account matches that address.
- Open the email received and click the link (valid for one hour).
- Choose a new password (between eight and sixty-four characters), confirm it, then submit.
- Log back in with the new password.
The reset link expires after one hour; past that point, simply make a new request. For privacy reasons, the message shown after the request is identical whether or not the address matches an existing account.
Components
The "Components" section gives access to three types of components.

Simple assessment components
"Scores" in the broad sense: discrete data (for example a pain level from 0 to 100) or modal data (for example the items of a multiple-choice questionnaire).

Protocols
A protocol combines several simple components needed for an assessment. Example: a positive-psychology protocol grouping five scores and observations.

Logs
Logs are a particular type of component: they correspond to files (for example ".pdf" files).

Adding a file to a log
From the "Logs" page, the "Add a file to the logs" link opens a form for placing a file in an existing folder or in a new folder.
- Choose the destination folder from the list, or enter the name of a new folder to create.
- Select the file to add (images, PDF, text, CSV, office documents, ZIP).
- Click "Add the file".
Actors
The "Actors" section (now on the main menu) gives access to actor management: List, Add, Import and Analysis.

The actor list lets you, in particular, assign a subject to a protocol (see below) and access the analysis by subject.
Assigning a subject to a protocol
- In the actor list, click "Add" in the "Protocol assignment" column, on the row of the desired subject.
- The record displays the list of protocols to which the subject is already linked.
- Select a protocol from the drop-down list, then submit.
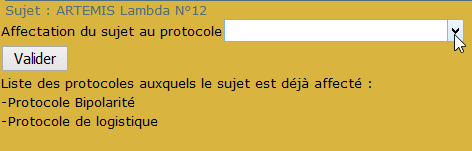
Assigning a subject to a protocol.

The same subject can be included in several protocols.
Importing actors (New)
You can create a batch of subjects at once from a CSV file.
- The file must be in the format: Reference key ; Last name ; First name.
- The role of each actor created is automatically "Subject".
- Actors whose reference key already exists are ignored (no duplicates); duplicates within the file are ignored as well.
- Maximum size: 100 KB; extension
.csv; semicolon separator; header row ignored.
A line-by-line report indicates, for each entry, whether it was imported or ignored (duplicate), with the total at the bottom of the page.

Analysis by subject (New)
The "Analysis" entry gathers, for a chosen subject, all of their assessments, organized by component. For each event, the result and its interpretation are recalculated automatically. An "Export to CSV" button lets you retrieve all of the subject's analyses.
- Choose the subject from the drop-down list.
- The results are displayed grouped by component.

Settings
The "Settings" section gathers the questions, the answers and the periodicities at which a component is applied.

Entering an answer set (New)
The class number is assigned automatically (the next free class). Enter each value on one row (value + label). The "Add a row" button lets you extend the table; "Remove" deletes a row. Submit to save the whole set at once.

Completing an answer set (New)
This page first lists the existing classes. By choosing a class, you see its values and can add new ones without recreating the set.

Answer list
The list shows all the values, sorted by class then by value. The link on each label opens the edit record. The "Export to CSV" button downloads the list (a UTF-8 file that opens directly in Excel).

Importing answers from a file (New)
You can import a batch of answers from a CSV file.
- The file must be in the format: Answer class ; Label ; Value.
- The class is read from the file (the page shows you the next free number).
- Maximum size: 100 KB; extension
.csv. - Tip: if you re-import an exported file, its header row is
automatically ignored.

Question sets
A question set groups several questions sharing the same question class. Each question has a label, a complement, a title, an order (Order) and, optionally, an associated answer class (drop-down menu). A question with no answer class corresponds to free entry.
Entering a question set (New)
The class number is assigned automatically. For each question, fill in the order, the label(s) and the title, then choose the answer class from the drop-down menu (or "none – free entry"). Add as many rows as needed, then submit.

Completing a question set (New)
As with answers, you can select an existing class and add questions to it, or edit those already present.

Question list
The list shows all the questions, sorted by class then by order. The link on the label opens the edit screen. An "Export to CSV" button is available.

Importing questions from a file (New)
- Expected format: Label 1 ; Label 2 ; Title ; Order ; Answer class.
- All the rows in the file are attached to a single new class
(the number is shown to you on screen).
- Maximum size: 100 KB; extension
.csv; header row ignored.

Question / answer sets
This summary page shows the correspondence between the questions and the answers associated with them.

Periodicities (New)
A periodicity describes an assessment rhythm (label, initial date reference, delay in seconds, comment).
- Periodicity list: shows the existing periodicities; the label
opens the edit record.
- Create a period: fill in the label, the initial date reference,
the delay and a comment, then submit.
- Edit a period: change the label and submit.


Filling in an event
An event is the filling in of a protocol for a given subject, at a specific period.

The list of events to fill in is reached through the "Fill in" sub-menu of the "Events" section (quick search with Ctrl+F).
To record an observation:
- Locate the row for the subject and period concerned.
- Click the "Entry" link in the "Fill in" column.
- Fill in each item using the drop-down lists, then submit.
Entry consists of filling in the values of an event (an "occurrence" of a component for a subject, at a given periodicity).
Occurrence highlighting (New)
On the screens that list the components to fill in for a subject, each row is colored according to the number of occurrences already entered:
| Color | Meaning |
|---|---|
| (none) | 0 occurrences — nothing has been entered yet |
| Pale green | 1 occurrence recorded |
| Pale amber | 2 occurrences or more — to keep an eye on |
This visual cue lets you see at a glance what is left to enter and what has already been filled in several times.

For a protocol, you can also fill it in component by component: from the grid of subjects assigned to the protocol, click "Fill in component" on the subject's row, then click each row to enter the corresponding score.
Viewing results
Results can be viewed in a grouped or individual way. Access is through the "Events" section, "View" sub-menu:
- the event log gives access to individual data;
- the records log gives access to grouped data.
The records log returns all the entered records — in coded form or with the labels of the fields — together with the assessments, and allows a one-click ".csv" export for further processing in a spreadsheet.

Grouped results
- "Events" section → "View" sub-menu.
- In the body of the page, click "Protocols log".
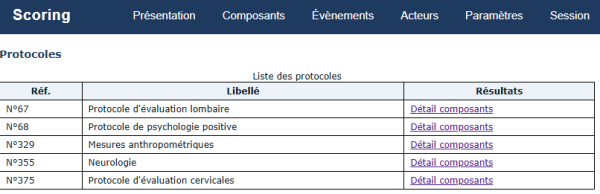
The protocols log.
- Click a protocol: the list of the components it contains is displayed.
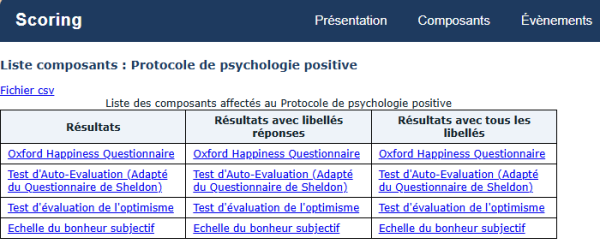
Components of a selected protocol.


The results can be viewed in several formats, with or without labels.

Example of grouped results for a simple component:

Individual results
- Open the actor list (menu "Actors" → page "List").
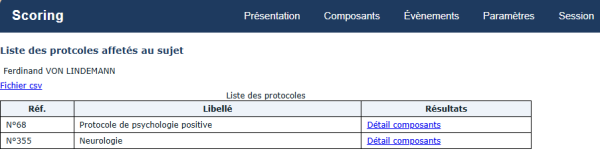
List of actors and their assigned protocols.
- For the desired subject, click "Assignments list" in the "Assigned protocols" column.
- Select the protocol whose assessed components you want to view.
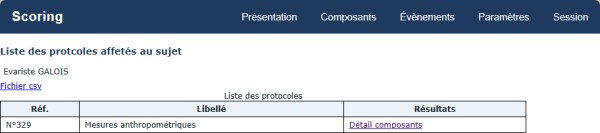
Selecting a protocol component for a subject.
- Click the protocol: the subject's name appears at the top of the page.
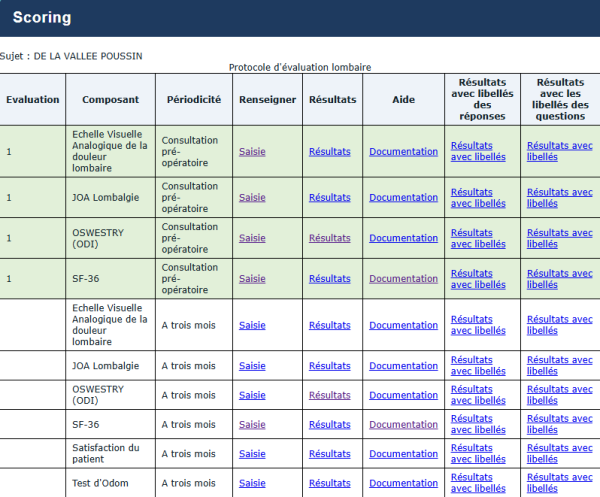
Assessment log of a subject.


You can choose to display the results with or without the answer or question labels.